Here are step by step instructions on how to manage a Shared Inbox or Distribution List. If you have any issues with these instructions, or question or concerns, please let us know and we would be happy to assist you.
1. Go to https://admin.cloud.microsoft/exchange?page=groups&form=owa_groups&ref=/#/ or navigate there manually:
- Open a web browser and go to www.queensu.ca
- Select the Sign In drop down in the top right-hand corner> Outlook on the web- Email
- In your Outlook, select the gear icon in the top right-hand corner.
- In the General tab select Distribution Groups > select the highlighted link in the "To manage distribution groups, visit this portal".
4. This should bring you to a portal that looks like this:

5. IMPORTANT: There are two tabs:
Groups I belong to (groups you are a member of): a member has the email in their inbox/email access and gets email notifications, and does not have the ability to manage the account members/owners, and is not able to make or request changes to the account.
Groups I own (groups you are an owner of): an owner doesn't have inbox/email access or receive email notifications, and has the ability to control members, owners, and is able to make or request changes to the account.
**If you are an Owner and would also like email access/notifications, you will need to be added as an Owner and also as a Member.**
6. In the Groups I own tab you should find the access groups that you are an Owner of > select the one your are trying to find and a side bar will open (pictured in step 7). Feel free to ask us if you are unsure of which account to select or do not see it listed here).
7. Go to the Members tab and you will see where you can View all and manage owners and where you can View all and manage members.
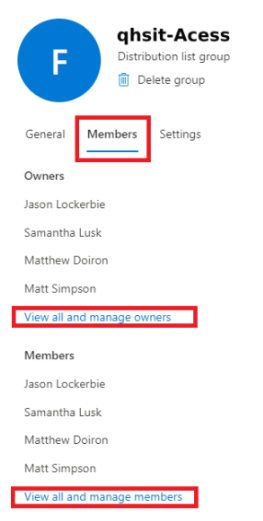
To add/manage members, select View all and manage members >This will give you a list of current members.
- To Remove any current members > Select the checkbox next to their name and select Delete.
- To add new members > Select +Add members > here you will be able to search for and add new members by putting their net ID or their full name in the search bar and pressing enter > Pressing the checkbox next to their name and selecting Add.

To add/manage owners, select View all and manage owners >This will give you a list of current owners.
- To Remove any current owners > Select the checkbox next to their name and select Delete.
- To add new owners > Select +Add owners > here you will be able to search for and add new owners by putting their net ID or their full name in the search bar and pressing enter > Pressing the checkbox next to their name and selecting Add.

Was this article helpful?
That’s Great!
Thank you for your feedback
Sorry! We couldn't be helpful
Thank you for your feedback
Feedback sent
We appreciate your effort and will try to fix the article